How can I install a specific version of gcc on ubuntu 18.04
Tested and confirmed using 18.04 on a box using an Intel core i5.
[As a guest, I don't have points enough to make active the 15 links that may be helpful. The first several of them are, therefore, "broken" by design.]
This tells the tale. To jump to the "bottom line," look for "Here's the Script."
The history of the venture
You've likely seen these,
https: // askubuntu.com/questions/214746/how-to-run-apt-get-install-to-install-all-dependencies
https: // askubuntu.com/questions/140246/how-do-i-resolve-unmet-dependencies-after-adding-a-ppa
Since you want to keep both versions, those approaches don't really apply. There are additional questions / answers that address forced installation of dependencies, but, again, that'll leave you with "one version" instead of more than one.
It's likely that the dependency issue you have experienced follows from the installation presumption of upgrade ("replacement") rather than parallel or independence ("supplementation").
Installing multiple versions techniques exist, but there may be an issue distinguishing 7.3 from 7.5
If it were possible to "comment," one question would be this:
Have you also tried uninstalling the existing version and reinstalling with the multiple version technique? E.g., https: // askubuntu.com/questions/923337/installing-an-older-gcc-version3-4-3-on-ubuntu-14-04-currently-4-8-installed (where the package is, packages are, identified with some specificity). See also, e.g., https: // linuxize.com/post/how-to-install-gcc-compiler-on-ubuntu-18-04/ .
However, one would need to distinguish between 7.3 and 7.5, which is different from distinguishing 7 from 8 from 9, as used on that example.
To try that technique, one would likely need to remove 7.5 so as then to install it in an "alternative" context.
Removal takes us down at least one of the following two paths. (Hint: this led to a brick wall, and maybe that's Ok.)
First, there's just basic, wholesale removal.
https: // www.youtube.com/watch?v=HKtjX_FBAnI (heavy non-English accent -- listen with focus, and it's fine)
It's about 5:07 into the 5:38 video that he gets to the "one liner" about uninstalling. He uses purge, and there's some more information on that process on various web pages, including here:
https: // vitux.com/how-to-uninstall-programs-from-your-ubuntu-system/
Since there's no use of, thus no "invested" set up for, 7.5, here, i.e., no love loss, it became a topic of experimentation and testing.
Via dpkg --list | more ,
determined that likely packages to remove were/are these:
- g++-7                  7.5.0-3ubuntu1~18.04
- gcc-7                  7.5.0-3ubuntu1~18.04
- gcc-7-base:amd64       7.5.0-3ubuntu1~18.04
But which?
Then doing
sudo apt search gcc-7 | more
got to
gcc-7 (7.5.0-3ubuntu1~18.04 amd64).
Thus,
sudo apt-get remove "gcc-7"
But, before doing anything like pressing "y," notice what all is included in this removal: build-essential, gcc, and g++. Didn't want to remove them.
Thus, secondly, that brings up the question of whether there is such thing as a partial removal. (Hint: there is, but it's probably not a good idea.)
https: // askubuntu.com/questions/17745/how-to-remove-a-deb-without-removing-its-dependencies
So,
(after sudo apt-get install aptitude) (it's Ok and even a good idea to get this functionality, but keep reading; this path led to a brick wall)
sudo aptitude unmarkauto build-essential gcc g++ [which didn't really change anything]
Then
sudo aptitude purge gcc-7
This gets us to the "options" list, and there were 6 options for this system.
One at a time, selected 3 (remove 7.5) (then selected/typed "a 3" (without the quotes, of course)), 5 (keep build-essential) (then a 5), and 6 (keep gcc) (then a 6) , then Y, to remove 7.5 and keep build-essential and gcc (for the earlier version just recently re-installed).
And, the system's follow-up was to this effect: "The system is now going to remove them all, anyway, no matter what," which is likely how the system protects the user from "rpm hell," i.e., goes to a long extent to prevent just this very sort of thing, namely partial removal.
Since the option there was to remove everything, I stopped. Just got finished, after about 5-6 hours, installing the prior version that I needed and don't want to go through that, again. (That's a foreshadowing of how that prior version now exists and is installed so as even to be subject to this dilemma.)
That's just to say that if there's nothing else there in the way of dependencies that you want to keep, then this is an alternative to the out-and-out "remove" process, either of which of these puts us right back into the same position of removing everything.
That's also to say that I haven't gone back to revisit this to include running sudo ldconfig after adjusting those packages via unmarkauto and trying that partial removal mechanism. It's sufficient to be aware of "rpm hell" and not rush into it.
That wholesale removal would be followed, then, by a dual or multiple version install technique, for which there are at least the discussions already mentioned, as just examples of the existence of such option. Again, since gcc-7 presently now refers to 7.5, it may be possible, with enough specificity in package identification, to accomplish a dual install of 7.3 and 7.5. Haven't tried anything like that, yet. Someone who has will be in a position to make comment on that whole angle of things. Maybe there truly is a simpler process.
Intro to the shell script
With all that in mind, here's the tested (with 7.4, keeping 7.5 as the "officially installed" version) and confirmed approach to install a prior version while keeping the systemically installed 7.5. It's "the hard way." Since the question has to do with "how to" accomplish such a parallel install, the answer is, "This is a way to accomplish the objective". That begs the very pregnant question, of course, which is whether what one produces by this process provides a working toolchain once it's all accomplished. That's something you'll need to confirm, of course, once you get there. That part involves at least being sure that your IDE (or whatever approach used for compiling, assembling, linking) points to the "right" set of tools and include libraries. So, as far as "how to," this is "the hard way" to produce a complete and independent installation of a prior version of the toolchain. Finalizing this may involve setting ln -s links or simply adding alternative paths in an IDE to tell the IDE where to look for the toolchain.
This time around, the installation location was ~/opt , i.e., /home/<username>/opt . That's the setting in the script, and I left that one "as is". It's possible, once you try this out and find it produces what you need, to change the script setting for $HOME with something like /opt (and reinstall). Another location for self-generated code is /user/local. (You likely already have these "good practice" concepts in mind.) Personally, once this shakes out and proves itself, /opt is likely the "final destination" for the toolchains built from scratch. For now, it happens that this particular drive is partitioned with a huge, ginormous (that might not be a word, but it's used, here, just the same) "home" space, and for this very type of situation: space to experiment that isn't directly "in the system file area".
In this context, then, one possible way to "read the silence" in the early stages after your posting of your question is that the answer you need isn't something as simple as what may already exist. If that's a valid "read" of the timing, here, and I'm new enough to the site not to know, yet, either way, then there's that subtle confirmation that the solution you're looking at is basically compiling from scratch, i.e., "the hard way."
Here's the Script
Now, it's not anything like as hard as it used to be. This is, in part, thanks to Darren Smith. https://medium.com/@darrenjs/building-gcc-from-source-dcc368a3bb70, and, in particular, https://github.com/darrenjs/howto/blob/master/build_scripts/build_gcc_9.sh , which is his install script (designed for 9.1). He's written a script that works like scripts are supposed to work. He wrote it looking forward, to 9.1. With some suitable adjustments, it works for legacy installations just as cleanly. He did good work on this.
[As for addressing the concept of potentially stale/dead links in the future, if you want to include the edits you've made to the script, presuming it works for you as well as it did for me, I'll let you post it. This contribution is already "long."]
Some thoughts going in.
Look through the script. Make sure you have wget and autogen installed. For example, after two hours of the process (which might not have been that long had I remembered to uncomment his line 19 so as to try to use multiple cores), it quit on me first time through. Why? I didn't have autogen installed. (This is a recent re-install of 18.04, and there are some things I just didn't have re-installed, again, yet.) There was some loss of effort there, and instead of "completing" from that juncture, I needed to delete two directories of compiled/assembled results (the script identifies which two when one restarts the script via the same command as originally used; be sure, after copy/paste of the script and adding in the edits below and saving that file (as a .sh shell script file), to sudo chmod +x <shellScriptName.sh> so as to activate it via ./<shellScriptName.sh> ), and had to run that part again, likely costing at least another hour. Not the end of the world; just frustrating. So, look through the script and for each command found, e.g., awk, just to be sure you've got that command / utility already installed. Should be, but it's Ok to check, anyway. (I used "whereis".)
Another value in looking through the script is to see that there are five pieces involved:
- gcc
- gmp
- mpfr
- mpc , and
- isl
See also, e.g., https://stackoverflow.com/questions/9450394/how-to-install-gcc-piece-by-piece-with-gmp-mpfr-mpc-elf-without-shared-libra
Each has a download step, and each has (at least) one source.
Config matters (yes, there are two intended meanings, here)
For 7.3, did some checking and found helpful information on this page:
In one of the answers down the page, there's a compiler output line with versions of each of these that are working in conjunction with 7.3.
GNU C11 (Ubuntu 7.3.0-27ubuntu1~18.04) version 7.3.0 (x86_64-linux-gnu)
- compiled by GNU C version 7.3.0,
- gmp version 6.1.2,
- mpfr version 4.0.1,
- mpc version 1.1.0,
- isl version isl-0.19-GMP
So, some "edits" to the script for 7.3 are these.
line 14 gcc_version=7.3.0
line 19 Uncomment this if you'd like.
More about using multiple cores
(Someone may want/need this.)
Run this command: lscpu
to get the info needed as to what the value could/should be to use with the -j flag.
That command provides, among other items of information, these items in particular:
CPU(s):   < a number, e.g., total >, a figure determined by multiplying these
                                     additional items
Thread(s) per core:     < a number, e.g., t/c >
Core(s) per socket:     < a number, e.g., c/s >
Socket(s):              < a number, e.g., s >
The -j number < e.g., total > = < t/c > * < c/s > * < s > = CPU(s)
At the identified site, CPU(s) = 32 = < t/c = 2 > * < c/s = 8 > * < s = 2 >
On the box here, CPS(s) = 4 = < t/c of 2 > * < c/s of 2 > * < s of 1 > . Thus, on this particular machine, j probably shouldn't be larger than 4. That said, some suggest overloading j to make sure it's at its peak. That's something left to each developer to determine.
- line 22
If there's a question, just check the gcc line in any -verbose compile listing you may have to confirm the processor (architecture) for your machine.
Running gcc -v is another way to try to get the architecture.
Running uname -m may be a little better. On this box, uname -m came back with "x86[underscore]64". Better syntax, of course, for the -march= option is x86[hyphen]64.
line 25
Long story short about "unknown", it's Ok to leave that as is.line 33 install_dir
As mentioned, I left this one as $HOME, i.e., ~/. If there's a change, /opt is a good choice, or /usr/local. If you already know either of those is preferred, great. I'm trying this out to shake out any "uniqueness" issues before committing this to a formal $PATH element.line 34 build_dir
This is set to build in the tmp directory in "system file" area. That worked just fine.line 35 source_dir
Left this one as is.line 36 tarfile_dir
Left this one as is.line 40 packageversion
Left this one as is.line 50 gmp_version
Given the compiler info associated with 7.3 mentioned above, left this one as is.line 54 mpfr_version
Given the compiler info above, changing this to 4.0.1 appears to be Ok.line 57 mpc_version
Given the compiler info above, changing this to 1.1.0 appears to be Ok.line 60 isl_version
Given the compiler info above, changing this to 0.19 appears to be Ok.
lines 153, 154, 155 -- the Download source code banner
This is where it'll be good to confirm the URLs.

[you'll need `wget` -- install it if necessary]
line 170 gmp source page
fine as isline 171 mpfr source page
The page used by the script also has the 4.0.1 version, so it's fine as is.line 172 mpc source page
That's an http: site; thus, direct access produces an access error. I left it "as is" and there was no issue. An alternative site is this: https://ftp.gnu.org/gnu/mpc/ .line 173 isl source page
The given infrastructure page has 0.18, but not 0.19. I changed this one to this site: http://isl.gforge.inria.fr/ (there was a momentary, flash-length only, pause while the connection was made to this overseas site; connection was just fine)line 174 gcc source page
Change this to this site: https://ftp.gnu.org/gnu/gcc/gcc-7.3.0/lines 224, 225
left as isline 291
There's enough going on that it made sense to uncomment this line to get these checks along the way.
autogen kicks in here "at the end" to produce the documentation.
Without setting -j, and taking advantage of access to a nominal 25 down / 6 up internet connection, this process took a couple of hours.
Confirmation of installation
I set up 7.4, and it's now in the ~/opt directory. Reinstalling it to /opt (root/opt) may happen once confidence is higher that this is what I need.
That said, this is a "how to" to get 7.3 installed along with the system's "encouragement" to use 7.5.
Summary.
The shell script works to install a parallel version of the toolchain. Just be sure to have the info it needs put into the right places and to have already installed the utilities (functions, command line commands) used by it. "As is," it'll install into ~/opt. This can take "a while." Here, it was a couple of hours.
Related videos on Youtube
 04 : 31
 02 : 05
 01 : 20
 01 : 39
 02 : 59
Hossein
Updated on September 18, 2022Comments
-
 Hossein over 1 year
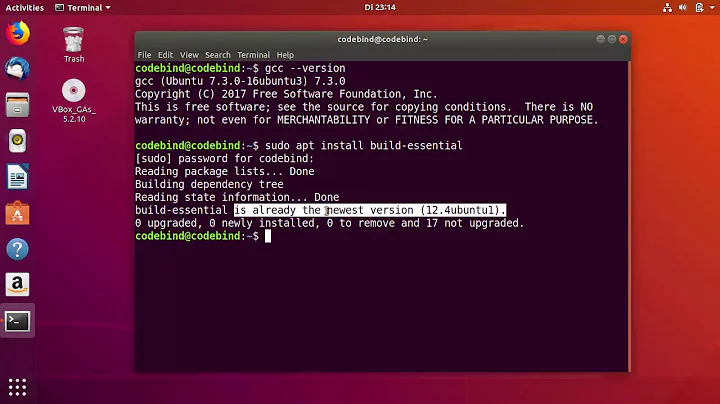
I'm trying to install gcc
7.3.0on ubuntu 18.04. Ubuntu got updated and now my gcc is 7.5.0. I have seen other questions on stack overflow, but they are either for older versions which their solution doesn't apply to me, or some newer solutions such as the one that suggests running :sudo apt-get install gcc-7 g++-7doesn't work as they report I have a newer version installed :
Reading package lists... Done
Building dependency tree
Reading state information... Done
g++-7 is already the newest version (7.5.0-3ubuntu1~18.04).
g++-7 set to manually installed.
gcc-7 is already the newest version (7.5.0-3ubuntu1~18.04).
gcc-7 set to manually installed.
The following packages were automatically installed and are no longer required:
  linux-headers-5.0.0-23 linux-headers-5.0.0-23-generic linux-image-5.0.0-23-generic linux-modules-5.0.0-23-generic
  linux-modules-extra-5.0.0-23-generic
Use 'sudo apt autoremove' to remove them.
0 upgraded, 0 newly installed, 0 to remove and 123 not upgraded.
What should I do to install gcc7.3.0 next to the current 7.5.0?
What I have done so far:
I found a package here downloaded it and tried to install it like this:
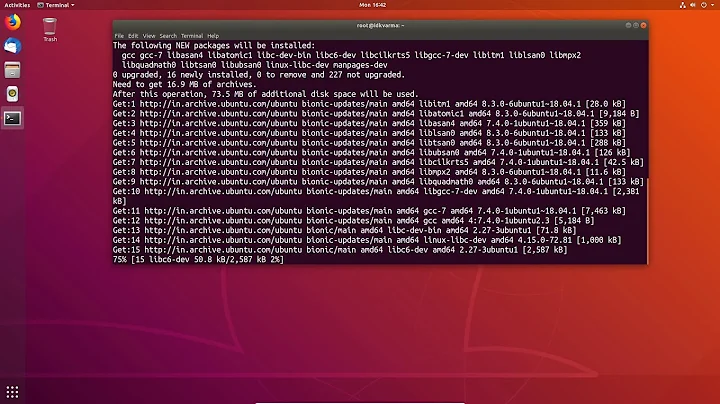
sudo apt install ./gcc-7-multilib_7.3.0-16ubuntu3_amd64.debbut it fails with this error :
Reading package lists... Done Building dependency tree Reading state information... Done Note, selecting 'gcc-7-multilib' instead of './gcc-7-multilib_7.3.0-16ubuntu3_amd64.deb' Some packages could not be installed. This may mean that you have requested an impossible situation or if you are using the unstable distribution that some required packages have not yet been created or been moved out of Incoming. The following information may help to resolve the situation: The following packages have unmet dependencies: gcc-7-multilib : Depends: gcc-7-base (= 7.3.0-16ubuntu3) but 7.5.0-3ubuntu1~18.04 is to be installed Depends: gcc-7 (= 7.3.0-16ubuntu3) but 7.5.0-3ubuntu1~18.04 is to be installed Depends: lib32gcc-7-dev (= 7.3.0-16ubuntu3) but 7.5.0-3ubuntu1~18.04 is to be installed Depends: libx32gcc-7-dev (= 7.3.0-16ubuntu3) but 7.5.0-3ubuntu1~18.04 is to be installed E: Unable to correct problems, you have held broken packages. -
Hossein about 4 yearsThanks a lot really appreciate it :)