How do I boot an ISO file from my drive using grub2 on UEFI machines?
Solution 1
There is a bug in grub 2.04 so ensure you have a prior or later version.
Well, the basics for adding an ISO file to grub are the same for an UEFI as for a BIOS machine: edit /etc/grub.d/40_custom and add a menuentry item (GParted is used in this example) to the bottom of the file:
menuentry "GParted Live ISO" {
}
Now we're going to add a variable containing the directory where we stored the ISO (so far, so good: no differences with BIOS machines):
menuentry "GParted Live ISO" {
  set GPartedISOFile="/opt/Live-ISOs/gparted-live-0.31.0-1-amd64.iso"
}
I'm using /opt to store these as I don't like creating directories in the root of my machine and according to the Linux File System Hierarchy that's where optional software should reside anyway.
Before we add the loopback variable, we need to find out on which hard disk the file is stored, so we do a: df --output=source /opt/Live-ISOs/gparted-live-0.31.0-1-amd64.iso | tail -1 and the output on my machine is: /dev/sdb2.
However grub uses (hdX,Y) notation and this is where the difference between UEFI and BIOS machines comes in! So now reboot your machine, go into the grub menu and press C: This will bring you to the grub command prompt with different commands than you're used to but the only one that you need is: ls.
On my machine the output is:
(hd0) (hd1) (hd1,gpt3) (hd1,gpt2) (hd1,gpt1) (hd2) ... (hd3) ...
Huh? 4 drives? I only have 3! And it's not (hd1,4) line on a BIOS but (hd1,gpt3) in UEFI and (hd0) has no partitions at all!
Well, apparently when part of the NVRAM is used as storage and shows up as (hd0) you need to start numbering your drives at 1! Whereas all the information you find on booting ISO files says you have to start numbering from 0 (on BIOS machines this is always true, this is not necessarily the case on some UEFI machines ! )
So the value for loopback becomes (hd2,gpt2)$GPartedISOFile as the ISO file on my machine was /dev/sdb2 (second drive hd2, second partition gpt2):
menuentry "GParted Live ISO" {
  set GPartedISOFile="/opt/Live-ISOs/gparted-live-0.31.0-1-amd64.iso"
  loopback loop (hd2,gpt2)$GPartedISOFile
}
Another difference is that the linux and initrd on BIOS machines are called linuxefi and initrdefi on UEFI machines, which gives us our final result:
#!/bin/sh
exec tail -n +3 $0
# This file provides an easy way to add custom menu entries.  Simply type the
# menu entries you want to add after this comment.  Be careful not to change
# the 'exec tail' line above.
menuentry "GParted Live ISO" {
  set GPartedISOFile="/opt/Live-ISOs/gparted-live-0.31.0-1-amd64.iso"
  loopback loop (hd2,gpt2)$GPartedISOFile
  linuxefi (loop)/live/vmlinuz boot=live components config findiso=$GPartedISOFile ip=frommedia toram=filesystem.squashfs union=overlay username=user
  initrdefi (loop)/live/initrd.img
}
So now save that file, and update grub with:
update-grub
After all of the above, reboot, go into the grub menu, choose GParted Live ISO and you can now easily boot your ISO without having to hunt for a USB stick ever again!
:-)
CloneZilla Live example (for this question )
menuentry "CloneZilla ISO" {
  set ISOFile="/opt/Live-ISOs/clonezilla-live-20170905-zesty-amd64.iso"
  loopback loop (hd2,gpt2)$ISOFile
  linuxefi (loop)/live/vmlinuz boot=live components config findiso=$ISOFile ip=frommedia toram=filesystem.squashfs union=overlay
  initrdefi (loop)/live/initrd.img
}
Solution 2
An alternative is to just add a configfile to 40_custom like this:
menuentry 'Live ISOs on SSD' {
configfile (hd0,3)/ISO/livecdimage.cfg
}
menuentry 'Live ISOs on HDD (boot on SSD)' {
configfile (hd1,3)/ISO/livecdimage.cfg
}
I do this as when I update an ISO, I invariably forget to run sudo update-grub. The above entries never have to change and I can just edit livecdimage.cfg which has the same format as any 40_custom but without header lines, and is in my /ISO folder in my ISO partition.
I do add toram as another boot parameter and on the system with Nvidia add nomodeset boot parameter. But still often have to unmount the /isodevice.
Unable to umount isodevice unmount ISO https://bugs.launchpad.net/ubuntu/+source/ubiquity/+bug/1155216
sudo umount -l -r -f /isodevice
And this is part of my livecdimage.cfg file
# livecdimage.cfg
# Add this to 40_custom to load this file:
# menuentry 'Live ISOs' {
# configfile (hd1,3)/iso/livecdimage.cfg
#}
# Add iso names to livecdimage.cfg
#for i in `ls *.iso`;do echo "# "$i>>livecdimage.cfg; done;
menuentry "Ubuntu 16.04.4 xenial amd64" {
    set isofile="/ISO/ubuntu-16.04.4-desktop-amd64.iso"
    loopback loop (hd0,3)$isofile
    linux (loop)/casper/vmlinuz.efi boot=casper iso-scan/filename=$isofile toram
    initrd (loop)/casper/initrd.lz
}
menuentry "Ubuntu 18.04 Bionic amd64" {
    set isofile="/ISO/bionic-desktop-amd64.iso"
    loopback loop (hd0,3)$isofile
    linux (loop)/casper/vmlinuz.efi boot=casper iso-scan/filename=$isofile toram
    initrd (loop)/casper/initrd.lz
}
# spacer line
menuentry " " {
set root=
}
menuentry "Reboot" {
    reboot
}
menuentry "Halt" {
    halt
}
Solution 3
mkusb MULTIBOOT HACK
Mkusb makes a great base for custom boot drive projects because of its abilities with both BIOS and UEFI.
This hack boots multiple ISO files including the Windows installer, and has a grub2 menu.
Grub2 menuentries for most OS are available using Google Search and are beyond the scope of this answer.

Use mkusb defaults when creating the Persistent USB drive.

Use mkusb persistence defaults if in doubt, partition size can be adjusted later but takes time.

The DUS Console after install.

GParted before partition modification.
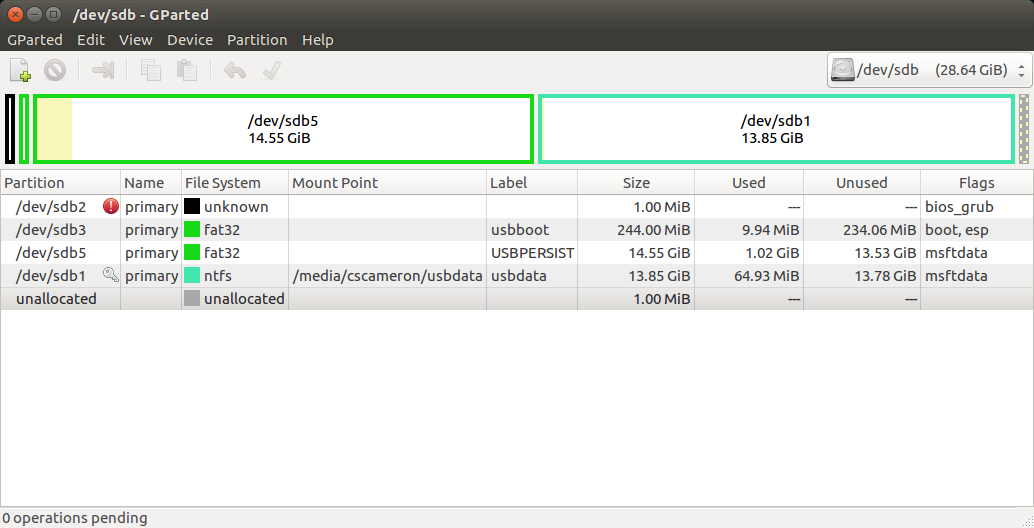
Gparted after modification - Overwrite sdb4, the ISO9660 OS partition and sdb5, the ext2 casper-rw partition, with a FAT32 partition for persistence files.

Persistence partition - Create an uniquely name folder for each OS, (that requires persistence)

Persistence folder - Add a casper-rw file and optional home-rw file to each persistence folder. A home-rw file can be made by renaming a casper-rw file. A home-rw file is like a seperate home partition on a Full install, it can be reused after version upgrades.

Create a folder for the ISO files on the NTFS usbdata partition.

Add some ISO's to the ISO folder.
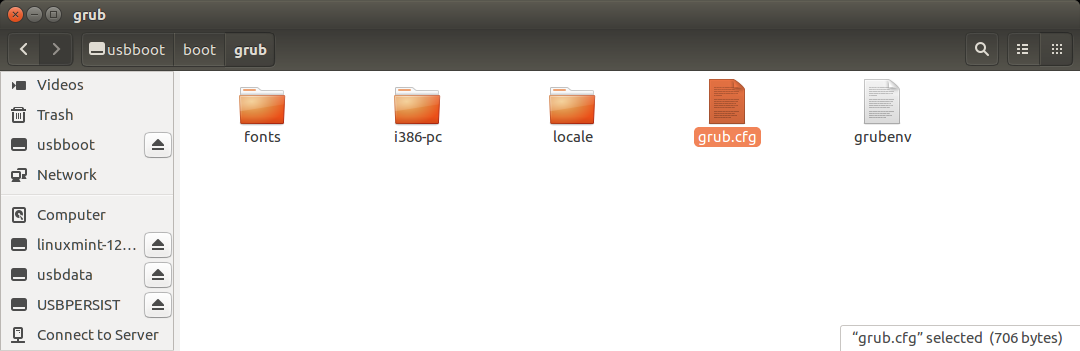
grub.cfg location

Edit grub.cfg to loopmount the ISO files. Include: persistent persistent-path=/<persistent-folder-name>/ if you want persistence. Add rmmod tpm to grub.cfg above the first menuentry.
EDIT 18.04+ In grub specify vmlinuz not vmlinuz.efi and initrd not initrd not initid.lz

sudo parted -ls /dev/sdb

sudo lsblk -f /dev/sdb
If a Windows installer is required it is possibly easiest to start with the mkusb "extracting Windows installer" function, (I had to extract the Windows ISO to TAR manually),
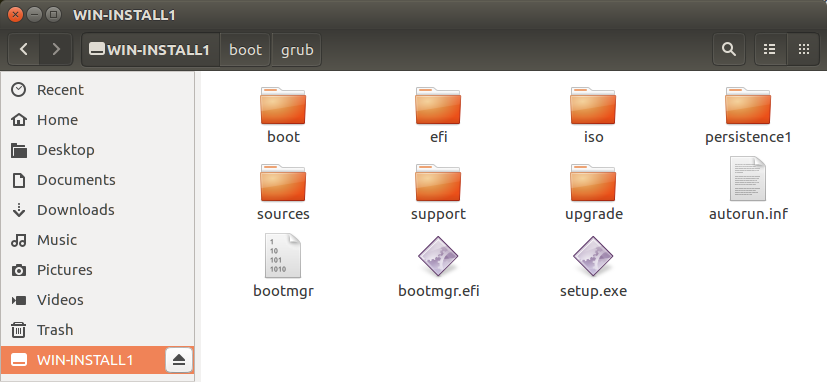
After installation create a folder for ISO's and if required, folders for persistence, (similar to above procedure).

Edit /boot/grub/grub.cfg to loopmount any ISO's and specify any persistence folders.
(have not found a way to loopmount a Windows ISO file).
If the above is used as a USB stick it can be used to boot ISO's stored on a Windows only computer. Grub is not required on the internal drive.
Solution 4
Three easy steps
to add ISO to the grub menu and boot from it.
First, install grml-rescueboot
Open a terminal and enter:
sudo apt install grml-rescueboot
Second, move the iso files to /boot/grml/
In the same terminal enter:
sudo mv ~/Downloads/<filename.iso> /boot/grml/
Third, update grub
In the same terminal enter:
sudo update-grub
Repeat second and third steps as and when necessary
Don't forget to delete obsolete ISO files from /boot/grml.
Reference: Ubuntu help on Grub2 ISO boot
Note
The grml-rescueboot does not work with all live ISO files. For example, the gparted live ISO does not work. See Unable to boot Gparted Live using grml-rescueboot
Hope this helps
Solution 5
MultiBootUSB - QEMU
If you want to boot ISO files with the least hassle and don't need persistence, MultiBootUSB includes a QEMU option:
Start MultiBootUSB and select the Boot ISO/USB tab.
Drag and drop the ISO on the Select image space.
Select RAM size and hit the Boot ISO button.
You don't need to edit grub.cfg or even log out.

Fabby
Updated on September 18, 2022Comments
-
 Fabby 3 months
I have a bunch of live ISO files like GParted, CloneZilla, Boot-Repair, Ubuntu 14.04 32 bit, ... downloaded in
/optand on my old BIOS machine, I used to be able to just add them to the grub menu and boot them. :-)I now have an UEFI machine and all the information I can find are for BIOS machines.
What are the steps to boot these ISO files from grub?
I'm just I'm sick and tired of "burning" these to a USB stick all the time as I can never find the stick I need whereas my computer itself if much harder to loose in the total chaos around me here...) :-(
-
 Organic Marble over 4 yearsDid you set up Clonezilla yet? It's a bit different, I can post that if you haven't figured that one out yet.
 -
Fabby over 4 yearsI'm going to post another answer for all of the ones I'll be adding tomorrow for the "gimme the codez" kind of people... @OrganicMarble
-
Fabby over 4 yearsI like the Reboot and halt ones! :-) +1 Why do you add the
insmod? You can also ping me in chat -
 oldfred over 4 yearsinmod probably not needed. With grub2 some features were built in and some were addin( the insmod). Probably in beginning I needed the insmod gpt as I started using gpt in 2010 or before pc were UEFI and grub2 was new & just for BIOS/MBR although would boot from gpt with BIOS.
 -
Fabby over 4 yearsThank you for the answer. Wouldn't it be better to remove those lines from the answer then?
-
oldfred over 4 yearsLet me edit my own stanza and see if 18.04 boots. I expect it will. I also wanted to update my gparted ISO boot entry which is now very old, so will be back in a bit.
-
oldfred over 4 yearsBooted ok. I forgot I had my 18.04 flash drive plugged in and it becomes hd0 on my system, so when booting I have to manually edit entry up one hdX to have correct drive. My gparted .25 boot did not work by just changing to .30. I had to look into ISO and see its grub.cfg and use those parameters & grub's loop commands, and then it worked.
-
Fabby over 4 yearsAnd how do you get these back on the HDD/SDD??? The question is about now wanting them on a USB stick, or did I miss something?
-
 sudodus over 4 years@Fabby, This is not only for USB sticks. If you have a new SATA drive, you can start as described in this answer and let mkusb install its robust boot system, that works in both UEFI and BIOS mode. This SATA drive can be installed internally or connected externally via USB or eSATA. It is possible to add both 'conventionally installed systems' and new iso files to be booted via 'grub-n-iso'.
 -
 WinEunuuchs2Unix over 4 years+1 but its probably safe to drop the
2fromupdate-grub2these days. -
Fabby over 4 years@WinEunuuchs2Unix It's in my history... I just type
upd↑and then copy-paste. Thanks for the reminder Updated! -
Fabby over 4 years
/bootis the worst place to put them. Sorry, looked into grml, should have mentioned it. +1 for effort though -
Fabby over 4 yearsOK, I still don't get it: I want these ISOs in
/opt/. How do I do that? (+1 in the meantime for effort though...) -
 user68186 over 4 yearsThanks @Fabby for the +1! This may not be the best way to do it, but this seems to be the easiest, IMHO.
 -
Fabby over 4 yearsThat's why +1: good answer for non-technical users.
-
 Meninx - メネンックス over 4 years@Fabby: I think Instead of making a new folder for the ISO's as shown above, point to the ISO's location in /opt/, in grub.cfg, grub on a pendrive can boot an ISO on the hard drive. I will give this a try.
 -
Fabby over 4 yearsNifty! I'm going to try this out later!
-
Meninx - メネンックス over 4 years@Fabby: There is a Windows version of MBUSB and a Linux version. I could not get the Windows version to boot ISO's, only USB's. The Linux version 9.2.0 works great for me.
-
Meninx - メネンックス over 4 years@Fabby: If the ISO's are on /opt/ of the internal drive the same menu entry that you are using on the internal drive will work on the external drive. There may be advantages to booting grub on a USB stick, such as not over crowding or corrupting the internal grub menu.
-
Fabby over 4 yearsI have 3 internal drives. the external drive is for backup only.
-
Meninx - メネンックス over 2 yearsAdding
rmmod tpmto grub.cfg above the first menuentry will solve the problem with booting ISO files in UEFI using GRUB 2.04 . -
 Admin 8 monthsVery easy solution. Tested and it works. The problem is that you have to put this image into /boot and boot partition is usually up to 1GB. So you might have to use small linux distribution.
 -
Admin 8 months@luke
/bootis not a separate partition in a default Ubuntu installation, unless you opt for LUKS encryption. My setup didn't have any encryption so this was not an issue. -
Admin 8 monthsGood to know. Yes, I had encrypted partition. So the problem with limited boot partition size occurs only when you have LUKS encryption. Thanks for telling me the truth :)