Image rounded corners in QML
Solution 1
A built-in official solution exists as of Qt 5 thanks to the QtGraphicalEffects module and I'm quite surprised to find out that no one provided such a simple solution. If you are targeting Qt 6.x QtGraphicalEffects is unfortunately deprecated so jump to the second part of the answer which proposes a solution independent of QtGraphicalEffects.
QtGraphicalEffects solution
Among the other effects OpacityMask is the type to be exploited for this purpose. The idea is to mask the source Image with a Rectangle that has a correctly set radius. Here goes the simplest example using layering:
Image {
    id: img
    property bool rounded: true
    property bool adapt: true
    layer.enabled: rounded
    layer.effect: OpacityMask {
        maskSource: Item {
            width: img.width
            height: img.height
            Rectangle {
                anchors.centerIn: parent
                width: img.adapt ? img.width : Math.min(img.width, img.height)
                height: img.adapt ? img.height : width
                radius: Math.min(width, height)
            }
        }
    }
}
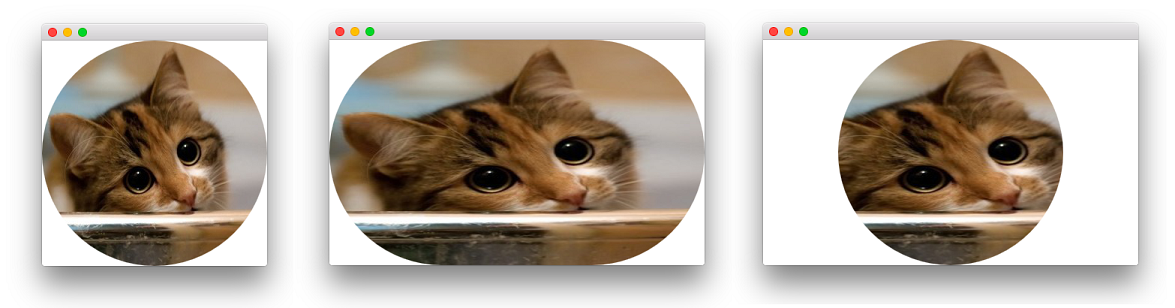
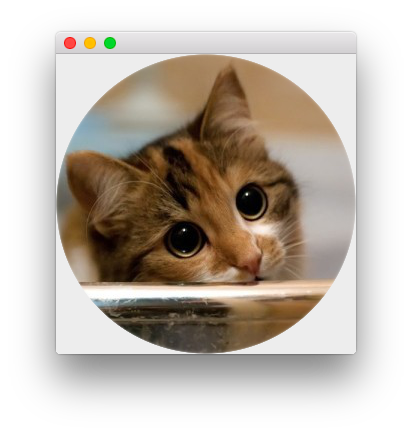
This minimum code produces a nice result for square images but
it also takes in account non-square images via the adapt variable. By setting the flag to false the produced mask will always be a circle, regardless of the image size. That is possible due to the usage of an external Item which fills the source and allows the real mask (the inner Rectangle) to be sized at please. You can obviously get rid of the external Item, if you simply aim to a mask that fills the source, regardless of the its aspect ratio.
Here is a cute cat image with a square format (left), a non-square format with adapt: true (center) and finally a non-square format and adapt: false (right):
The implementation details of this solution are very similar to those of the shader-based answer in the other nice answer (cfr. the QML source code for OpacityMask that can be found here - SourceProxy simply returns a well-formed ShaderEffectSource to feed the effect).
No-dep solution
If you don't want to - or can't - depend on the QtGraphicalEffects module (well, on the presence of OpacityMask.qml actually), you can reimplement the effect with shaders. Apart from the already provided solution another approach is to use step, smoothstep and fwidth functions. Here is the code:
import QtQuick 2.5
Image {
    id: image
    property bool rounded: true
    property bool adapt: true
    layer.enabled: rounded
    layer.effect: ShaderEffect {
        property real adjustX: image.adapt ? Math.max(width / height, 1) : 1
        property real adjustY: image.adapt ? Math.max(1 / (width / height), 1) : 1
        fragmentShader: "
        #ifdef GL_ES
            precision lowp float;
        #endif // GL_ES
        varying highp vec2 qt_TexCoord0;
        uniform highp float qt_Opacity;
        uniform lowp sampler2D source;
        uniform lowp float adjustX;
        uniform lowp float adjustY;
        void main(void) {
            lowp float x, y;
            x = (qt_TexCoord0.x - 0.5) * adjustX;
            y = (qt_TexCoord0.y - 0.5) * adjustY;
            float delta = adjustX != 1.0 ? fwidth(y) / 2.0 : fwidth(x) / 2.0;
            gl_FragColor = texture2D(source, qt_TexCoord0).rgba
                * step(x * x + y * y, 0.25)
                * smoothstep((x * x + y * y) , 0.25 + delta, 0.25)
                * qt_Opacity;
        }"
    }
}
Similarly to the first approach, rounded and adapt properties are added to control the visual appearance of the effect as discussed above.
Solution 2
This code would help you
Rectangle {
    width: 200
    height: 200
    color: "transparent"
    //this Rectangle is needed to keep the source image's fillMode
    Rectangle {
        id: imageSource
        anchors.fill: parent
        Image {
            anchors.fill: parent
            source: "your_image_file_path"
            fillMode: Image.PreserveAspectCrop
        }
        visible: false
        layer.enabled: true
    }
    Rectangle {
        id: maskLayer
        anchors.fill: parent
        radius: parent.width / 2
        color: "red"
        border.color: "black"
        layer.enabled: true
        layer.samplerName: "maskSource"
        layer.effect: ShaderEffect {
            property var colorSource: imageSource
            fragmentShader: "
                uniform lowp sampler2D colorSource;
                uniform lowp sampler2D maskSource;
                uniform lowp float qt_Opacity;
                varying highp vec2 qt_TexCoord0;
                void main() {
                    gl_FragColor =
                        texture2D(colorSource, qt_TexCoord0)
                        * texture2D(maskSource, qt_TexCoord0).a
                        * qt_Opacity;
                }
            "
        }
    }
    // only draw border line
    Rectangle {
        anchors.fill: parent
        radius: parent.width / 2
        border.color: "black"
        border.width: 2
        color: "transparent"
    }
}
Solution 3
When your background is a solid color or when you're never moving the image, a fast way to make rounded corners is to overlap your Image with another one (or with a BorderImage) that only draws the corners.
When this is not an option, but you are using OpenGL, then another way is to apply a mask to the image through a pixel shader. See http://blog.qt.digia.com/blog/2011/05/03/qml-shadereffectitem-on-qgraphicsview/ for a plugin that works on top of Qt 4.
Finally, it's also possible to write a QDeclarativeImageProvider that preprocesses your image to make the corners rounded.
Solution 4
If you have a unicolor background, you can draw with the border of a rounded rectangle on top.
Image{
    id:img
}
Rectangle { // rounded corners for img
    anchors.fill: img
    color: "transparent"
    border.color: "blue" // color of background
    border.width: 4
    radius: 4
}
Solution 5
While both the accepted answer and the one from @fury worked equally well for me (Qt 5.9.3), they both left some aberrations in the corners when applied to raster images (didn't have those with SVG). What worked best for me in all cases was to apply the OpacityMask to a surrounding item, e.g. like the rectangle in the original post.
Rectangle {
    id: root;
    anchors.right: rectContentBg.left
    anchors.top: rectContentBg.top
    anchors.margins: 8
    radius: 8
    width: 64
    height: 64
    // apply rounded corners mask
    layer.enabled: true
    layer.effect: OpacityMask {
        maskSource: Rectangle {
            x: root.x; y: root.y
            width: root.width
            height: root.height
            radius: root.radius
        }
    }
    Image {
        id: imgAuthor
        opacity: 1
        smooth: false
        anchors.fill: parent
        source: "qrc:/res/sample_avatar.jpg"
    }
}
Comments
-
 Tamás Szelei 11 months
To my surprise, the
Imagecomponent has noradiusproperty. I tried emulating the rounded corners by putting the image in a roundedRectangle, but it does not clip the corners.Rectangle { anchors.right: rectContentBg.left anchors.top: rectContentBg.top anchors.margins: 8 radius: 8 width: 64 height: 64 Image { id: imgAuthor opacity: 1 smooth: false anchors.fill: parent source: "qrc:/res/sample_avatar.jpg" } }How can I create an image with rounded corners properly?
-
Tamás Szelei over 11 yearsThey really should make this happen instead of fancy 3D stuff they are doing now :/
-
 Akash Agarwal over 6 yearsGreat answer, thanks! I want to point out something in your first approach that if you are using a single rectangle in an item, you don't need to declare the item and can use rectangle directly because rectangle inherits item.
 -
 Mark Ch about 6 yearsit works so long as radius is larger than border.width
 -
Mark Ch about 6 yearswhilst this answer does work, I am left with occasional rendering artefacts meaning it doesn't look very professional on its own. Fortunately the glitches are only the vertical lines (on win7) so 2 well placed rectangles can clean it up.
-
 Phrogz about 5 yearsWhy do you wrap the
Rectanglein anItem? -
 BaCaRoZzo about 5 years@Phrogz the effect fils the source and even if I set
adapttotrueI cannot have the result in the third picture of the first series. If you have a square picture like in the first picture, the outerItemis simply useless. -
 mohammad alabid over 4 yearswant to add , if you targeting mobile device you should set layer.textureSize, so you keep the full resolution
 -
 Mohammad Kanan 11 monthsDeclarativeMaskedImage borken link
 -
Mohammad Kanan 11 monthsone of the correct answers for Qt6 where QtGraphicalEffects module is only a legacy
-
Mohammad Kanan 11 monthsNot suitable for Qt6 , QtGraphicalEffects module is discontinued
-
Mohammad Kanan 11 monthsQtGraphicalEffects is discontinued in Qt6