Ubuntu 16 Samba server with Windows 10 client - Tutorial/Howto
Solution 1
First, if you made any changes to an existing samba configuration, revert them, or delete the /etc/samba/smb.con and uninstall samba.
I assume your Ubuntu server username is peterlustig and the Ubuntu server IP is 192.168.2.42.
sudo apt-get install sambasudo cp -pf /etc/samba/smb.conf /etc/samba/smb.conf.bakJust backup your configsudo mkdir /myshares- what you want to share via Sambasudo chown peterlustig:peterlustig /mysharessudo chmod 777 /mysharesor experiment with lower rights, I havn't done that yetsudo smbpasswd -a peterlustigAdds the user peterlustig to the Samba database and activates it. (Usually different password than peterlustig in Ubuntu itself. The password is what you need to enter later when connecting with the Windows 10 client to the server, step 10)sudo nano /etc/samba/smb.confAnd add the following to the bottom of the file:# Samba share for Windows clients [my-shared-folder-name] path = /myshares available = yes valid users = peterlustig read only = no browseable = yes public = yes writable = yessudo /etc/init.d/samba restartrestart your server and reload the config- If you use the
ufwFirewall, you need to configure it. E.g. I allow only 192.xxx.xxx.xxx hosts to access my Samba shares, so I entered:sudo ufw allow from 192.0.0.0/8 to any app Samba - In the Windows 10 client, open a Windows Explorer and enter the IP address of your host:
\\192.168.2.42. Now you should see your shared folder namedmy-shared-folder-namefrom step 8 in the[]brackets. Open it. Now you need to enter your credentials, i.e. usernamepeterlustigand the password you entered in step 6.
You can even map it as Windows network drive. Address will be \\192.168.2.42\my-shared-folder-name, and don't forget to enable using different credentials (than your Windows 10 user provides) and enter peterlustig and password from step 6 there.
Hope this helped anyone. Happy sharing!
Solution 2
Restart Ubuntu after fresh installation and add user
$ sudo smbpasswd -a username (username should be without space eg "sudo smbpasswd -a alamjitsingh")
New SMB password:*********
Retype new SMB password:*********
Added user alamjitsingh.
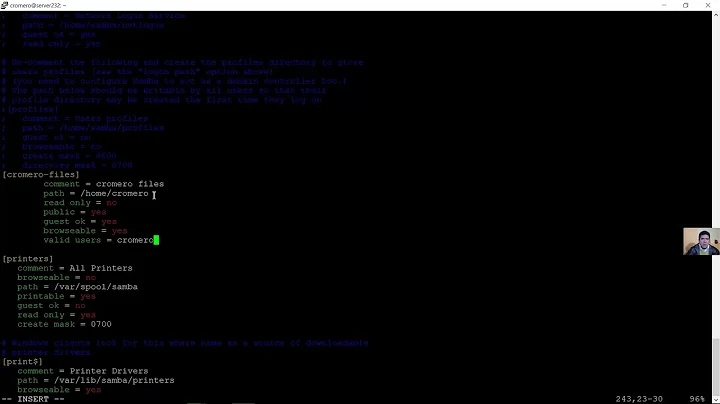
smb.conf required settings
sudo -H gedit /usr/share/samba/smb.conf


[global]
 workgroup = WORKGROUP
 passdb backend = tdbsam
 security = user
In authentication section turn "map to guest = bad user" off by adding # at starting of code (Must)
#map to guest = bad user
You can try adding this line if it's not working (replace with your username):
force user = alamjitsingh
Add your personal code at the end
[Shared_drive_Name]
path = /media/alamjitsingh/Shared_drive_Name (alamjitsingh is my ubuntu username)
comment = HD Share
read only = yes
available = yes
browseable = yes
writable = no
guest ok = no
public = yes
printable = no
locking = no
strict locking = no
Related videos on Youtube
 24 : 24
 20 : 36
 12 : 17
 03 : 15
 07 : 50
user3069376
Updated on September 18, 2022Comments
-
user3069376 over 1 year
I had some problems with connecting my Windows 10 computer to my Ubuntu 16.04.1's samba server. Finally I got it.
So how to share files on the Ubuntu 16 server with Windows 10 computers?
-
user1234440 over 7 yearsConsider making this community wiki.
-
Alamjit Singh about 7 yearsWith this method I can access my shared drive on win10.
-
Alamjit Singh about 7 yearsafter fresh installation, start reading from Restart Ubuntu.......
-
 Zanna about 7 years@MarkYisri why?
 -
Alamjit Singh about 7 yearsIn windows 10 you have to "Add a Network Location" manually, eg "\\192.168.1.3\ Shared_drive_Name" then it will ask for username and password. Find this option->Add a Network Location in windows 10. In android devices you can access this shared drive via "ES file explorer" app.
-
user1234440 about 7 years@Zanna it is helpful information that can be used (and edited) by anyone. Community wiki encourages that
-
cstrutton about 7 yearsStep 8 should be
sudo systemctl restart smbd -
Kevin Li almost 7 yearsThat was the one thing I missed when connecting to my newly-minted share in my Ubuntu live session. I kept double-clicking the share without success, and then finally tried “Map Network Drive.” I can’t believe that actually worked!
-
mcbarron about 6 yearsShouldn't step 8 be
sudo service smbd restart? -
 BuvinJ over 5 yearsThe
ufwdetail took care of my problem.