adding a cuda file to an existing c project in visual studio
Solution 1
I found that the best way to do this is to perform the following in the existing CPU project
1) Build Dependencies -> Build Customisations
click the Cuda checkbox
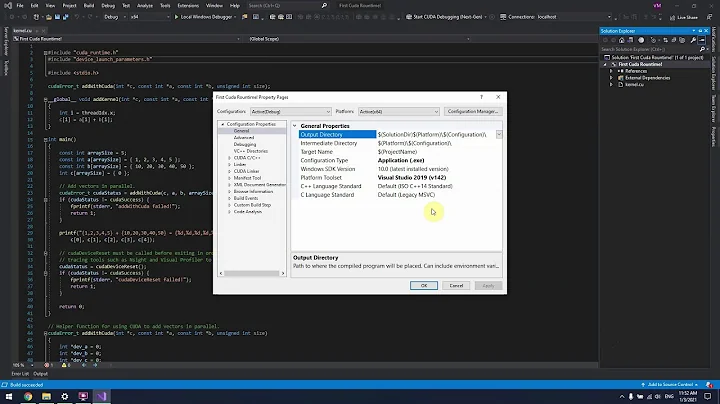
2) Create a new simple CUDA project using the wizard (you anyway probably want to test your CUDA project builds ok firstly), load both projects into the IDE and then compare settings between the two projects, you will need to add the following in project settings
$(CudaToolkitLibDir) to additional libraries settings (linker tab) $(CudaToolkitIncludeDir) to additional include directories (c++ tab)
cudart.lib to additional dependencies (linker tab)
Then compare the CUDA tabs
I found that 32 bit had been pre-selected for the target machine architecture for some reason so I changed that to 64 bit.
After this I added a define _CUDA_CODE_COMPILE_ to preprocessor definitions to switch between CUDA or CPU compilation.
#ifdef _CUDA_CODE_COMPILE_
    cudaCodeFunction();
#else
    cpuCodeFunction();
#endif
Not ideal but necessary since there seem to be no defines set to indicate that NVCC is installed (other than performing a shell command!)
Solution 2
I can't go through it all at the moment but I think those steps are necessary:
- Right click on your Project in the Project Explorer Build...(customization?) [my Version is German. I can't tell the keyword exactly but it's something about "Build...". You need to check "CUDA 5.0" here.
- Set up the "Additional Include Directories" for Cuda in the "General" Tab of the Compiler options (Project Properties).
- Add the cuda libfile to "Additional Dependencies" in the "Input" Tab of the Linker.
- Mark the File as Cuda file (you've done that).
Related videos on Youtube
 02 : 23
 01 : 23
 12 : 04
 02 : 18
 02 : 30
 03 : 49
 05 : 50
 01 : 47
shaveenk
Updated on September 18, 2022Comments
-
shaveenk over 1 year
I am trying to add a CUDA file to my existing C++ Visual Studio project. I have the CUDA 5.0 SDK installed, I have created a new .cu file and also set its Item Type to CUDA/C++ in the CUDA file properties. But it looks like it just does not compile giving errors that say that the compiler does not recognize the CUDA keywords. One of the errors I get is:
error C2065: 'threadIdx' : undeclared identifier
Any suggestions?
-
shaveenk almost 11 yearsDoesn't VS switch to NVCC when we change the type to CUDA/C++? I tried creating a new CUDA project and made the project properties match. I also added the same header files that were used in the new CUDA project. Didn't help.
-
shaveenk almost 11 yearsI followed the exact same instructions. In step 3 you mean cudart.lib right? I am still ending up with the same errors. One thing I have to mention is that my .cu file does not have a main function. I am calling the functions written in the .cu file from the .cpp files. I have both device and host codes in the .cu file and I'm only calling the host function from the .cpp file. I guess this should be alright?
-
 LawfulEvil about 8 yearsIn VS 2013, right click on project, then Build Dependencies, then Build Customizations... and then you get a pop up with the installed Cuda versions and you check the box for the version you want.
 -
 Serge Rogatch almost 6 yearsCould you elaborate why you need
_CUDA_CODE_COMPILE_? In which files -.cppor.cu? Do you mean that for the same function you have both CPU and CUDA implementations and you are switching between them this way? -
 ejectamenta almost 6 yearsI put it in the .cu file but you can also put it in the cpp file. Yes I am using the flags for switching in case the project is built on a machine without CUDA
 -
 Kari about 5 yearsfollowing your advice I fixed it by adding
;$(CUDA_PATH)\include;inside C/C++ ->General ->Additional Include Directories