How to change partitions on Ubuntu virtual machine?
Solution 1
Here is what worked in the end:
Enlage the img (virtual disk image) file for the VM:
-
Create raw disc file
sudo qemu-img create -f raw addon.raw 10G -
Backup current img
sudo mv domain.img domain.old.img -
Combine original and extra to create img file of new larger size.
sudo cat domain.old.img addon.raw >> domain.img
Now we have a larger image but the VM still has old partition table.
Now the tricky part.
The next steps are done on the host machine with VM shutdown
Download iso file for gparted:
wget -c http://sourceforge.net/projects/gparted/files/gparted-live-stable/0.6.4-1/gparted-live-0.6.4-1.iso
Boot the iso with the virtual image as the harddrive in the virtual system
kvm -m 512 -hda domain.img -cdrom gparted-live-0.6.4-1.iso -boot d
We are basically launching a virtual system kvm that will boot from the cdrom -boot d and gparted is in the cdrom -cdrom gparted-live-0.6.4-1.iso and in this virtual system treat domain.img as the harddrive -hda domain.img and allocate 512mb memory for this virtual system-m 512.
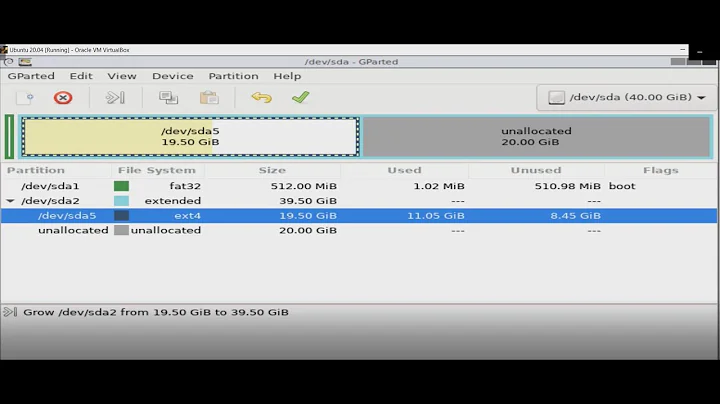
Now gparted pops up with a nice GUI (there is probably a command line option as well) ready to repartition your virtual disk.
Now you can manipulate the partition table just like you were using a liveCD on a real machine.
Most of this information was taken from this blog post by Chris Walden.
Thanks guntbert for pointing me in the right direction (i.e. it is possible to boot a VM from a liveCD).
Solution 2
You need to connect your VM with the iso of a live CD - the file you can download. I assume you are not using a GUI-Tool (like virt-manager ), so you will have to do it from the command line.
You can use virsh to get an XML file of the VM config (I called my VM qemu1)
virsh dumpxml qemu1 > qemu1-config.xml
Now edit that file, look for something like
<disk type='file' device='cdrom'>
  <driver name='qemu' type='raw'/>
  <target dev='hdc' bus='ide' tray='open'/>
  <readonly/>
  <alias name='ide0-1-0'/>
  <address type='drive' controller='0' bus='1' target='0' unit='0'/>
</disk>
and replace it with
<disk type='file' device='cdrom'>
  <driver name='qemu' type='raw'/>
  <source file='/media/data/isos/gparted-live-0.13.0-1.iso'/>
  <target dev='hdc' bus='ide'/>
  <readonly/>
  <address type='drive' controller='0' bus='1' target='0' unit='0'/>
</disk>
The important points are
- adapt the paths and file names
- the line
<source file=.../>contains the iso-file - the line
<target .../>should not containtray opennow
And now you put the new settings into effect with
virsh define qemu1-config.xml
The VM will need a restart.
Solution 3
You can use gParted and the resize from command line. Type...
sudo -i
parted
It will show
GNU Parted 1.7.1
Using /dev/sda
Welcome to GNU Parted! Type 'help' to view a list of commands.
(parted)
list will show a lot of commands ...
(parted) list
  check NUMBER                             do a simple check on the file system
  cp [FROM-DEVICE] FROM-NUMBER TO-NUMBER   copy file system to another partition
  help [COMMAND]                           prints general help, or help on COMMAND
  mklabel LABEL-TYPE                       create a new disklabel (partition table)
  mkfs NUMBER FS-TYPE                      make a FS-TYPE file system on partititon NUMBER
  mkpart PART-TYPE [FS-TYPE] START END     make a partition
  mkpartfs PART-TYPE FS-TYPE START END     make a partition with a file system
  move NUMBER START END                    move partition NUMBER
  name NUMBER NAME                         name partition NUMBER as NAME
  print [free|NUMBER|all]                  display the partition table, a partition, or all devices
  quit                                     exit program
  rescue START END                         rescue a lost partition near START and END
  resize NUMBER START END                  resize partition NUMBER and its file system
  rm NUMBER                                delete partition NUMBER
  select DEVICE                            choose the device to edit
  set NUMBER FLAG STATE                    change the FLAG on partition NUMBER
  toggle [NUMBER [FLAG]]                   toggle the state of FLAG on partition NUMBER
  unit UNIT                                set the default unit to UNIT
  version                                  displays the current version of GNU Parted and copyright information
-
printwill show the disc lay-out and add a number to a disc; -
resize {number}will let you resize a disc. - This will only work on umounted partitions ;)
I never used it this way myself so be careful when issuing commands.
Related videos on Youtube
 10 : 14
 08 : 21
 10 : 02
 07 : 54
 04 : 37
Dan
Updated on September 18, 2022Comments
-
 Dan over 1 year
Original Question: How to resize root partition without live CD?
I have a virtual machine that I need to make bigger. I made the VM img larger and now I need to resize the partitions so I can use the extra space.
This is my current partition table and the goal is to combine
/dev/vda1and/dev/vda2.
vda1is my current root partition
vda2is an extended partition that containsvda5(swap)Device Boot Start End Blocks Id System /dev/vda1 * 2048 18874367 9436160 83 Linux /dev/vda2 18876414 20969471 1046529 5 Extended /dev/vda5 18876416 20969471 1046528 82 Linux swap / SolarisThis would be simple with Gparted and a live CD, but I can only ssh to the server, or open it in virt-manager but it is still command line only. How can I possibly resize the root partition?
The VM is Ubuntu server 12.04.
-
 geethujoseph over 10 yearsSo you can delete/remove vda2 and vda5?
-
-
Dan over 10 years"This will only work on unmounted partitions". That is my hangup. I can't unmount the root partition.