Resize a partition image with GParted?
Solution 1
You can't do this with GParted, but you can use the ntfsresize command directly on a disk image.
First, clone the disk image. You can find the disk device name using blkid or gParted, and then run:
sudo dd if=<disk device> of=<image file>
For example:
$ sudo dd if=/dev/sda2 of=disk.img
1000000+0 records in
1000000+0 records out
512000000 bytes (512 MB) copied, 9.33361 s, 54.9 MB/s
Then, verify if you can resize it to the size you need by running:
ntfsresize -i <image file>
For instance:
$ ntfsresize -i disk.img
ntfsresize v2011.4.12 (libntfs-3g)
Device name        : disk.img
NTFS volume version: 3.1
Cluster size       : 4096 bytes
Current volume size: 511996416 bytes (512 MB)
Current device size: 512000000 bytes (512 MB)
Checking filesystem consistency ...
100.00 percent completed
Accounting clusters ...
Space in use       : 4 MB (0.6%)
Collecting resizing constraints ...
You might resize at 3035136 bytes or 4 MB (freeing 508 MB).
Please make a test run using both the -n and -s options before real resizing!
In this example, I can resize all the way down to 4MB because I just made a blank disk image for illustration purposes!
Now you can do the test run if you'd like, although it's not strictly necessary since you're operating on an image. You can specify the size in kilobytes, megabytes, or gigabytes by appending a k, M, or G, respectively:
ntfsresize -cnvs <size> <image file>
For instance:
$ ntfsresize -cnvs 256M disk.img
ntfsresize v2011.4.12 (libntfs-3g)
No output is good output! Now do it for real:
ntfsresize -vs <size> <image file>
Last example:
$ ntfsresize -vs 256M disk.img
ntfsresize v2011.4.12 (libntfs-3g)
Device name : disk.img
NTFS volume version: 3.1
Cluster size : 4096 bytes
Current volume size: 511996416 bytes (512 MB)
Current device size: 512000000 bytes (512 MB)
New volume size : 255996416 bytes (256 MB)
Checking for bad sectors ...
Checking filesystem consistency ...
100.00 percent completed
Accounting clusters ...
Space in use : 4 MB (0.6%)
Collecting resizing constraints ...
Needed relocations : 625 (3 MB)
WARNING: Every sanity check passed and only the dangerous operations left.
Make sure that important data has been backed up! Power outage or computer
crash may result major data loss!
Are you sure you want to proceed (y/[n])? y
Schedule chkdsk for NTFS consistency check at Windows boot time ...
Resetting $LogFile ... (this might take a while)
Relocating needed data ...
Relocate record 1:0x80:00000001:0x00000000:0x0000f423 --> 0x00007a11
Relocate record 2:0x80:00000624:0x00000000:0x0000f424 --> 0x00007a12
100.00 percent completed
Updating $BadClust file ...
Updating $Bitmap file ...
Updating Boot record ...
Syncing device ...
Successfully resized NTFS on device 'disk.img'.
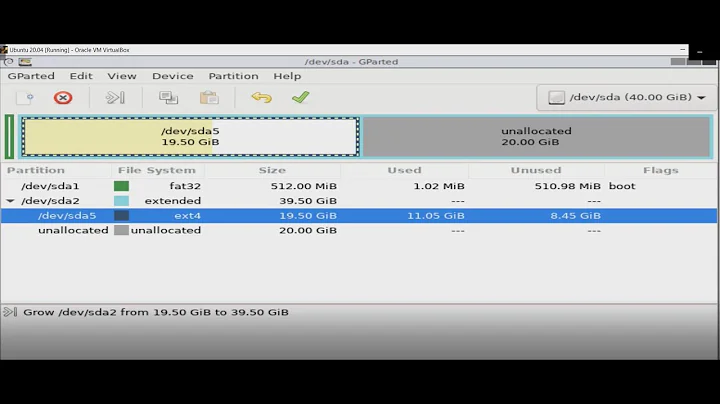
You can go on to shrink the device for example with Linux fdisk.
IMPORTANT: When recreating the partition, make sure that you
1) create it at the same disk sector (use sector as the unit!)
2) create it with the same partition type (usually 7, HPFS/NTFS)
3) do not make it smaller than the new NTFS filesystem size
4) set the bootable flag for the partition if it existed before
Otherwise you won't be able to access NTFS or can't boot from the disk!
If you make a mistake and don't have a partition table backup then you
can recover the partition table by TestDisk or Parted's rescue mode.
That's it! Now you can copy that disk image to the new device.
Solution 2
I'm not sure what the situation was 5 years ago, but today it's cake.
$ sudo udisksctl loop-setup -f disk.img
Mapped file disk.img as /dev/loop0.
$ gparted /dev/loop0
$ sudo udisksctl loop-delete -d /dev/loop0
To grow or shrink the disk after you could use truncate -s. Keep in mind that this would wipe out any backup partition table at the end of the disk, or other data if not used properly.
The benefit this has over using losetup is that it shows which loop device is assigned. It also looks at the partition table and sets up a loop device for each partition. That is not particularly useful for using gparted on the disk, but makes it super easy to take an image of a drive and mount a specific partition within that image.
Related videos on Youtube
 08 : 01
 10 : 31
 10 : 14
 03 : 09
 09 : 21
endolith
I used to run Ubuntu, but then I upgraded to Windows 7.
Updated on September 18, 2022Comments
-
endolith almost 2 years
I've resized partitions in GParted before. Now I'd like to move a large but mostly empty partition to a smaller drive. Instead of resizing it in place, I'd prefer to make a copy on a 3rd drive (drive image using dd), resize the copy, and then dd the copy to the new drive. But I don't think Gparted operates on drive images? How would I do this? Can I use the tools GParted uses directly?
Ooh! Or can I use a loopback thing to make the image file look like a physical drive that gparted can operate on?
-
Ankush over 7 years
-
-
endolith about 13 yearsI don't want to resize it in place. Don't want to screw up the original if I don't have to.
-
endolith about 13 yearsI'm converting a partition from Drive A (which I want read-only) into an image file on Drive C, resizing it, and then moving it to a partition on Drive B, which is smaller than A (so I have to resize first).
-
endolith about 13 yearsI used resize2fs on an ext3 image file last night, and the file itself was reduced in size afterward! :) I thought that would be a separate step because the filesystem is not the same as the partition.
-
Patches about 13 years@endolith: Yes,
ddthe logical partition. If you did the extended partition you'd get all the logical partitions inside it! -
endolith about 13 years@Patches: Well there's only one logical partition inside it, of the same size. :)
-
Patches about 13 years@endolith: Still, I think
dding the extended partition will bring in extra info that will confusee2fsprogsandntfsprogs. They don't know anything about partitions, as you discovered earlier. -
endolith about 13 years@Patches: Yeah, that's what I figured
-
 FlexMcMurphy about 3 yearsCan you explain what this does differently than
sudo losetup --find disk.img? Because when I uselosetupthen open in gparted when I go toresizethe partition ondisk.imgthe size of the .img file doesn't change. -
 endrias about 3 yearsThis seems wrong as you would have to unmount a filesystem before being able to do any modification to it using
gparted, And as soon as you useumount /dev/loopXXorudisksctl unmount -b /dev/loopXXto unmount it, the block device disappears and you wouldn't have loope block to callgparted -
user7455651 over 2 yearsThe 'loop-setup' option does not mount any filesystem. What it does do better than losetup is map the image to a loop device, including partitions. So, it actually looks at the partition table and sets up sub loop devices like /dev/loop0p1.