Ubuntu 14.04 LTS live USB boot error (gfxboot.c32:not a valid COM32R image)
Solution 1
As Filip Sohajek mentioned, you need to hit Tab.
Then you will see a set of options (live, live install, etc). Select the one that you like typing its name and pressing Enter.
Solution 2
Permanent fix using the defective bootable USB itself
Short version
TL;DR; for when you know what you're doing:
In the boot: prompt after you hit the error above, type live and press Enter, to start the Live USB session.
Open a terminal (e.g. with Ctrl+Alt+t) and type each command line below one by one:
sudo -i
apt-get update
apt-get install syslinux
mount | grep cdrom
The last command above shows you to which device your bootable USB is connected.
Important! replace /dev/sdb1 in the command below in the terminal with the device in the output of the last command above:
syslinux /dev/sdb1
Reboot and enjoy!
Long version
This error happens because you used a distribution with an earlier version of the syslinux package to create the bootable USB of a distribution expecting a later version (thanks, Amir Ali Akbari for the bug link).
This error also happens if you're using, say, Ubuntu 14.04 to make a bootable USB stick for anything from Ubuntu 15.04 and above.
The workaround mentioned by Filip Sohajek in Lucio's answer works, of course, but considering the Utopic release notes I linked above, and the workaround mentioned there to use the same Ubuntu version as the boot image to create the boot image, it should be possible to fix the issue permanently from within the live CD itself:
Boot the bootable USB stick until you get to the error message:
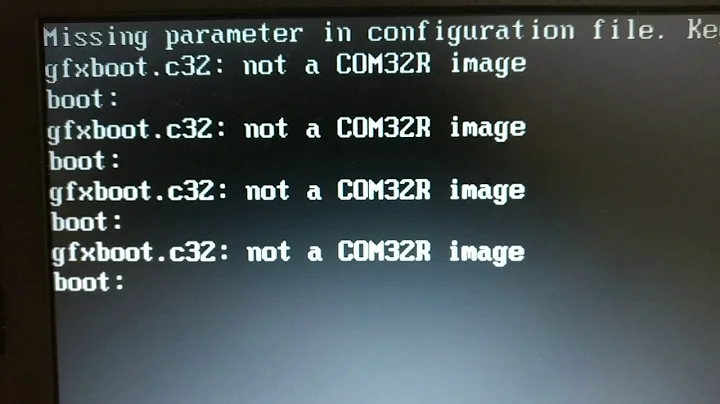
Unknown keyword in configuration file: gfxboot.c32: not a COM32R image
boot:
At the boot: prompt, type live and press Enter (no need to press TAB, as it only serves to show you the options available to you, including live).
Once you're inside the live Ubuntu session, configure it so you can access the internet (e.g. by connecting to a WiFi network).
Open a terminal window (e.g. press Ctrl+Alt+T). And type the following sequence of commands one by one (saying "Yes" to any confirmation prompts):
sudo -i
apt-get update
apt-get install syslinux
The first gives you root access and the last two install the newer syslinux package you need to fix your bootable USB. So now you need to figure out what exactly are you fixing, i.e. what is the device name where your bootable USB is connected.
In the terminal window above type
mount | grep cdrom
You should see an output like
/dev/sdb1 on /cdrom type vfat (... lots of irrelevant mount flags ...)
The most important part is the first "word" above. It'll usually be /dev/sdb1 but it could be something else if you have more disks attached to your machine.
Alternatively, you can launch the gparted command from the user interface and go through the disks to see which device is connected to /cdrom
Now type the command below in the terminal window, being very careful to replace /dev/sdb1 with the device you got from the previous command:
syslinux /dev/sdb1
The last command above overwrites the earlier version of syslinux in the boot sector of your bootable USB device partition with the correct version that matches the distribution itself.
That's it! Now reboot and you should be able to go through the normal GUI flow of the Live USB.
Of course, if you have a bootable Ubuntu media that doesn't have an evaluation option, like the Ubuntu Server installation media, you can't use it to fix itself, but you can use the desktop version to fix the server version with the instructions above. Just plug the server version media into the usb after the desktop version is already booted and use the device for the server version in place of /dev/sdb1 above.
Solution 3
When I attempted to solve this, I got a few different options, but it worked. Following Filip's answer, I pressed TAB and then a few choices popped up (none of which were "live" or anything containing "live" but it did say "Install", so after typing install and hitting enter it gives you choices for screen resolution, and then will proceed to the installation. So, a bit confusing, but it does work!
Solution 4
This doesn't work for me. I get:
Initramfs unpacked failed: junk in compressed archive. (...) Kernel panic - not syncing: VFS: Unable to mount root fs on unknown block(2.0) (...)
I had to adopt a very ugly solution, but it worked like a charm. I went into a friend's office, ask him to let me use one of the computers running Microsoft Windows. I think it was Windows 7 or 8, in any case more modern than Windows XP but not yet this recent one with the Cortana stuff... Then I created a usb disk with ubuntu, by downloading first a small program called Universal USB Installer and everything went fine.
Related videos on Youtube
 01 : 09
 01 : 37
 02 : 42
 04 : 23
 01 : 58
jamius19
Updated on September 18, 2022Comments
-
jamius19 over 1 year
I downloaded Ubuntu 14.04 (64 bit) lts. I made a bootable usb stick. But I keep receiving this error message upon booting:
SYSLINUX 4.04 EDD 20110518 Copyright (C) 1994-2011 H. Peter Anvin et al Unknown keyword in configuration file: gfxboot.c32: not a COM32R image-
 Chinmaya B almost 10 yearsmention the download link and system details also are you dual booting windows??
 -
 Admin almost 10 yearsI solved it with following procedure : - Boot - Hit TAB - Type live - Hit enter
 -
itnet7 over 9 yearsI had the some problem with attempting to boot 14.10 from live usb, Filip's suggestion worked for me.
-
myusuf over 9 yearsYou could just type
liveand press enter. Worked for me. -
 Knowledge Cube about 9 yearspossible duplicate of "Not a COM32R image" error when trying to install from a USB key
-
-
evergreen over 9 yearsLucio: it's great for me, kubuntu 14.10.
-
 ElScorcho over 9 yearsThis clearly isn't a 'thanks'. I am pointing out that Flip's answer can have other possible outcomes, of which others may be confused by, and begin a new topic on. So, instead, I am pointing this out on the original question.
 -
 web.learner over 9 years@guntbert I'm inclined to call this at least a partial answer, since it points out a major error in another answer (no "live" option) and provides a semi-workaround.
 -
Tal Weiss about 9 yearsWorks, but WHY???
-
 Lucio about 9 yearsHeh, bug buddy. This was clearly designed by a Unix developer who is careless about UI :)
 -
Amir Ali Akbari about 9 years
-
 Sts01 almost 9 yearsWhat is the
hdoption? -
 Heather92065 about 8 yearsThis solution works for 16.04 too.
 -
 pkout about 8 yearsI followed these instructions only to the point of being able to boot to Kubuntu Live. Once I got there, I went to the K menu and found Applications -> System -> Install this system permanently to your hard disk menu item. From there, a nice GUI guided me through the installation.
 -
LeoRochael about 8 years@pkout, of course, if all you want is to get (?)ubuntu installed on your machine, you don't need to actually fix the gfxboot error. Glad you managed to install Kubuntu on your machine!
-
Kevin Lyda almost 8 yearsMakes sense, unfortunately it doesn't seem to work on the server version. I did an alt-f2 to get a terminal on the console but there's no apt-get...
-
LeoRochael over 7 years@KevinLyda, I haven't checked, but it makes sense it wouldn't have apt-get since it's only supposed to work for permanent installation, not evaluation. You could, however, use the desktop version to fix the server version.
-
Kevin Lyda over 7 yearsIt's possible the rescue mode might have worked. Instead I did the install, installed syslinux on the new server and then fixed both the desktop and server install usb keys.
-
LeoRochael over 7 years@KevinLyda, I investigated the rescue mode in the server media, but there is no syslinux there and I couldn't find an easy way to add it. Your solution of actually installing the system will always work, of course.
-
 WinEunuuchs2Unix over 7 years+1 wonderful time saving answer. After
sudo apt updateI did asudo apt upgradeto make live usb current. It takes an additional 432MB but there is 4GB of persistence created by the startup disk creator. -
desgua over 7 yearsGreat answer! If I could I would give you more upvotes... Thank you!
-
Reinier Post over 7 yearsThis is a workaround, not a fix.
-
JJones over 7 yearsI had to download a newer version from syslinux.org ( no need to compile.. executable in zip file's linux directory ). For YUMI multiboot pendrive: sudo ./syslinux --install -d multiboot /dev/sdX1 . Find X for sdX1 using dmesg after plugging in your usb drive.
-
Admin about 7 years+1 For explaining "This error happens because...". This is exactly what power users need to know, but less likely to be explained by most answers that I read.
-
 sudodus over 6 yearsThe problem of the original question is a known bug (affecting the Ubuntu Startup Disk Creator and some other tools) in Ubuntu 14.04 LTS. In 16.04 LTS there is a new and cloning version of the Ubuntu Startup Disk Creator. Other cloning tools work with all versions of Ubuntu, for example Disks alias
gnome-disksand mkusb, help.ubuntu.com/community/mkusb and in Windows Win32 Disk Imager, wiki.ubuntu.com/Win32DiskImager/iso2usb -- You might be affected by another problem, and will probably get better help if you ask a new (and own) question. -
yaobin over 5 years@TalWeiss See Leo's answer below, the "Long version" part.
-
Xandel about 5 yearsThis solution works for 18.04 too.
-
Prashant Adlinge almost 3 yearsThis solution works for 20.04 LTS as well