Word Create Several Document Properties in Quick Parts
Solution 1
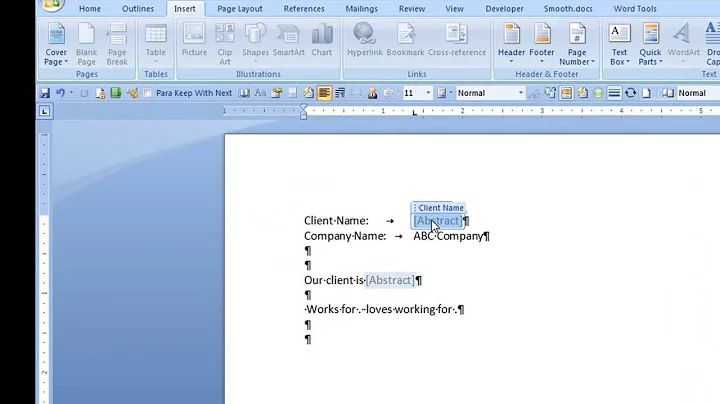
Add Custom Properties
If the available document properties are not enough for you and you wish to add your own, open the
Filescreen.From the current
infoscreen, click on thePropertiescombo box on the right. PickAdvanced Properties(Note: This is Word 2013, it might look different than your Word version.)From the dialogue box, open tab
Custom. Write a name you prefer or choose from the list beneath. FromType, chooseText. Then write the value that will be associated with the property you are creating. Now clickAddand repeat this until you are done with every property you want to create. ClickOKto confirm your changes.
(Type offers different format for the value; it could be a normal text, a date, a number, or a Yes/No option.)
Use Custom Properties in Document
Like default document properties, your custom ones are treated as fields in Word, so from the Ribbon, choose
INSERT \ Quick Parts \ Field.In the left list in the dialogue box, highlight
docProperty. From the mid list, choose your document property and insert it with buttonOK.
Add Fields as Written Codes
You don't need to open the dialogue box at
INSERT \ Quick Parts \ Fieldif you remember the name of your property. From your document where you want to insert your property, hitCTRL + F9.In the empty greyed space between special curly parentheses, write
docproperty myproperty, wheremypropertyis the name of your document property. HitF9and thenSHIFT + F9to display the value.
What are Fields?
They are codes that represent variable contents in your document. Many inserted contents are basically fields, yet Word knows you like to see what these codes result in. If any document property (and eventually, any field) does not show updated results, highlight it and press
F9.F9updates (on highlighted fields).-
CTRL + AthenF9update every field (sometimesCTRL + Pdo the same). -
SHIFT + F9toggle code and results. -
ALT + F9toggle code and results for every field in the document. -
CTRL + F9insert field space to write code.
Solution 2
I had the same question and was looking for the same solution. I know how to create a fillable Word document, but what I needed was a way that someone could enter information in to an area and have it auto populate that same information several other places in the document. I have a 35 page grant agreement form that lists the person's name, grant dates, and other information several places throughout the agreement. Quick Parts > Document Properties would be a solution to my problem, but I too needed more fields than the 9 Doc Properties that are listed. I finally found the answer by mapping content controls with the XML Mapping Pane. I found a YouTube video that shows how to write the xml code in Microsoft Notepad and then apply it to work within my document. The video by Laura Leader can be found here: https://www.youtube.com/watch?v=OtFhIqK0gec **Note, Laura got the information and credits the gregmaxey word tip pages website here: https://gregmaxey.com/word_tip_pages/contentcontrol_enhancements_word_2013.html
Related videos on Youtube
 05 : 37
 12 : 17
 04 : 56
 02 : 29
 04 : 01
 04 : 32
Comments
-
Bijan over 1 year
I am currently using Quick Parts > Document Properties to create fields that can update other parts of a Word document. I.e. if I change one field, all other similar fields will change as well. Problem is that I need a few dozen of these.
Is there a way to add more of these? Saving text to Quick Part Gallery does not work because I need this to be updated if it changes
-
 Admin about 8 years"Saving text to Quick Part Gallery does not work because I need this to be updated if it changes" - can you describe what types of changes you envisage?
 -
Bijan about 8 yearsThere are multiple fields and if the text of one changes, the text of all the other one changes automatically. Quick Parts Gallery is good for inserting snippets of text but if you make a change to it, it won't change what you have already inserted
-
Admin about 8 yearsthanks for the clarification. The things in the Document Properties dropdown are "sdt"s (Structured Document Tags) that display values of some of Word's built-in document property fields or from some special Cover Page Property fields. To make "properties" that work the same way (so that Word updates their values automatically), you have to use code, e.g. VBA, or you have to have to have SharePoint. Only the "properties" created in SharePoint appear on this list. sdts created using VBAare not on the list, but you can save them as Quick Parts and those should work the way you hope.
-
-
 Kar.ma over 6 yearsThis answer is very detailed but it lacks to specify one important point, which makes it unfit for OP needs. The use of "Quick Parts > Document Properties" makes the document AUTO-UPDATE every instance of the property when any of the occurrencies is edited, and this reason is precisely why the OP is using this feature. The use of "Quick Parts > Field" (or the alternative equivalent sequence) inserts a text that is not to be edited. When you edit an occurrence nothing changes about the other ones. Plus, when you update the reference (e.g. pressing F9), the original value is restored.
 -
Kar.ma over 6 years(needed to split comment in two because it was too long). Of course you can modify the text by replacing the value inside the "Advanced properties" window, but it's not as much as handy. Unfortunately, I am still looking for a different workaround, but still haven't found any solution without the use of VBA code.
-
 Charles Kenyon about 3 yearsI came late to this question when I saw it referenced in another question and saw it still did not have an answer.